Robotics framework - Core components
Posted on December 29, 2022 by Zach Lambert ‐ 6 min read

The first step of designing this framework was to work out how different software components were organised, and how data was passed between them.
Some key distinctions from ROS that I wanted to satisfy were:
- Make it easier to run components in the same thread (for easier debugging), in multiple threads in the same process, or in multiple processes (possibly on different machines).
- Give flexibility in choosing how data is passed between software components, having it be shared in memory where possible (avoiding serialization).
- Offload lots of configuration into compile-time, such as ensuring “topics” are being connected correctly and have the same type.
- Make it easy to configure component parameters at runtime, and have this be saved and loaded automatically.
Signals and components
The system is organised as a collection of components, each with input and output ports. When ports are connected, data will be routed appropriately.
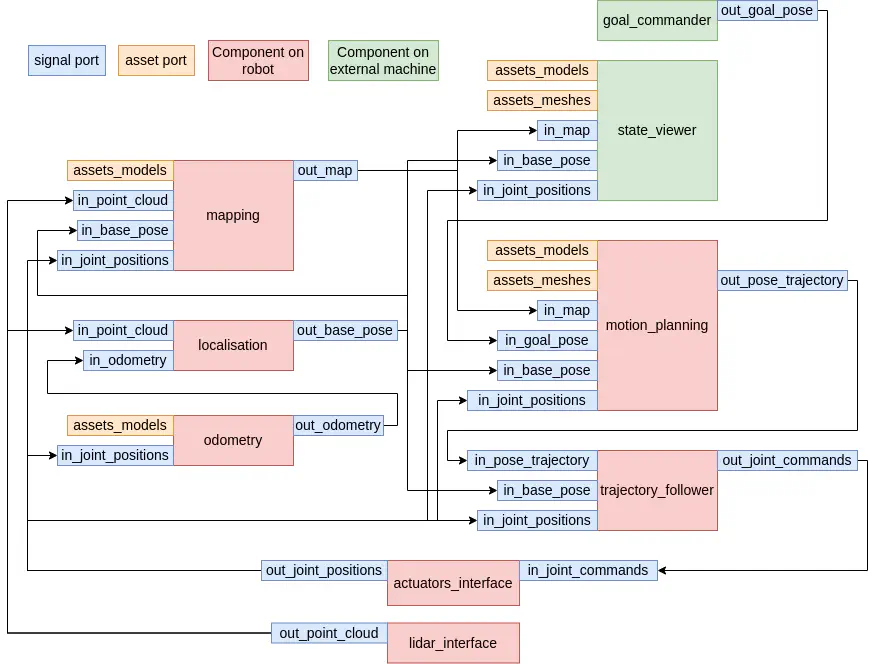
For example, to connect the output joint positions to the odometry component, this is written in code as:
signal::connect(
    actuators_interface.out_joint_positions(),
    odometry.in_joint_positions());
Each port has a specific data-type, such that on compilation, it verifies that ports are suitably connected.
The ports are provided as references to base input and output signal types.
class ActuatorInterface {
    // ...

    signal::Input<VectorXd>& in_joint_commands() {
        return in_joint_commands_;
    }
    signal::Output<VectorXd>& out_joint_positions() {
        return out_joint_positions_;
    }

private:
    signal::DirectOutput<VectorXd> out_joint_positions_;
    signal::SampledInput<VectorXd> in_joint_commands_;
};
Port types
There are three types of input port at the moment, which change how input data is processed:
- signal::CallbackInput<T>: Executes a callback function on receiving data, and keeps data in a circular buffer to avoid blocking and missing data. Suitable when every input message needs to be processed.
- signal::SampledInput<T>: Maintains the last received message only, available on request. If new messages are received before the previous one is read, the value is overwritten. If the message is being read when a new message is received, this swaps between two input buffers to avoid blocking. Suitable when only the latest value of an input is needed.
- signal::DirectInput<T>: Executes a callback function on receiving data, but leaves the callback code responsible for any caching and buffering of data. Suitable when dealing with large message sizes and it is worth processing the data directly instead of copying unecessarily by buffering.
Each input port has a callback which is called by the connected output port. Therefore, buffering the data is almost always more suitable to avoid blocking writing to the output port.
There are two types of output port:
- signal::DirectOutput<T>: Immediately writes data to input ports, when the output port is written to.
- signal::TimedOutput<T>: The output port maintains the last written message, which is written to output ports at a set frequency.
Component execution
When constructed, each component is passed a reference to the program “core” object. The core maintains a thread pool, which are dispatched to handle callbacks in component code.
In addition to input port callbacks, components can create a clock object, and create callbacks for a given frequency.
Each clock must also accept a “time sync” input message, which sets the system time and it’s rate, allowing the update rate of components to match the actual time in simulation or data playback, where the time isn’t the system time, and may not run at realtime rate.
Asset management
When components require “assets”, they take an AssetManager<T> object in the constructor.
An asset manager simply fetches resources from file and keeps in memory, such that other components can access them too.
This is also suitable for when assets are “generated”, such as generating meshes from primitive objects, and could also be extended to fetch resources from a server.
There are two ways assets can be accessed:
- Read the asset and process once.
- Load the asset with a callback function, which will be triggered on any subsequent asset changes.
In the case of loading with a callback, one example might be if a sensor frame needs to be corrected, and this should trigger an update to the code responsible for publishing the sensor frame transform.
Configuration
All config is done using json files. Since configuration is going to be an integral part of the system, I decided to write my own parser and reader/writer so I had more control over it.
A given value in a json object is accessed via a json “node” object. To read and write from a value:
bool success = node.read(my_type);
node = some_other_value;
This can be done on any datatype that provides a template specialisation for relevant json_function:
struct MyStruct {
    int x;
    std::string y;
};

template <>
serialize::json_functions<MyStruct> {
    static bool from_json(
        serialize::JsonConstNode node,
        MyStruct& value)
    {
        bool valid = true;
        valid &= node["x"].read(x);
        valid &= node["y"].read(y);
        return valid;
    }
    void to_json(
        const MyStruct& value,
        serialize::JsonNode node)
    {
        node.set_object();
        node["x"] = x;
        node["y"] = y;
    }
};
If a type provides the from_json and to_json functions, the type supports the serialize::readable_json and serialize::writable_json concepts respectively (using concepts from C++20).
This allows serialize functions to be provided for standard library containers and optional, so long as the type supports the relevant concept.
For any component that requires config from a json file, it will load the file on construction, and save on destruction.
Gui
I’m using Imgui for the gui since it is easy to use. Two things added to make writing gui code easier, are widgets and standardised gui code for editing values.
Windows and widgets
There is a single widget component. For another component to be used in a window, it must inherit from gui::Widget.
Then, the window accepts the list of widget components in it’s constructor.
Viewport viewport(...);
CommandEditor command_editor(...);
TerminalEmulator terminal_emulator(...);

Window window(... ,
    viewport,
    command_editor,
    terminal_emulator
);The window will manage loading/saving config for it’s widgets too.
Editing values
For any type, this can be edited with:
boo modified = gui::edit(label, my_value);In the same was as the json code, this is implemented with template specialisation for specific types.
struct MyStruct {
    int x;
    std::string y;
};

template <>
serialize::gui_functions<MyStruct> {
    static bool edit(
        const std::string& label,
        MyStruct& value)
    {
        bool modified = false;
        if (ImGui::TreeNode(label.c_str())) {
            modified |= gui::edit("x", x);
            modified |= gui::edit("y", y);
            ImGui::TreePop();
        }
        return valid;
    }
};
Annotated variant
Finally, I like using std::variant<…>. In order to make it easier to work with this for json and gui code, I added an annotated_variant concept.
An annotated variant is a variant that provides the following methods:
typedef std::variant<
    Box,
    Cylinder
> Shape;

template <>
struct variant_details<Shape> {
    static constexpr std::size_t count = 2;
    static Shape construct(std::size_t i) {
        switch (i) {
            case 0:
                return Box();
            case 1:
                return Cylinder();
            default:
                assert(false);
                return Box();
        }
    }
    static std::size_t index(const Shape& shape) {
        if (std::get_if<Box>(&shape)) return 0;
        if (std::get_if<Cyinder>(&shape)) return 1;
        assert(false);
        return count;
    }
    static std::string_view label(std::size_t i) {
        static const char* labels = {
            "box", "cylinder"
        };
        assert(i < count);
        return labels[i];
    }
}
{{ /highlight }}

This then enables:
- Constructing a variant from a string of it's type, to use when loading from config.
- Editing a variant and selecting from a set of options.
- Getting the label of a variant, to use when writing to config.